Home automation is the technique of controlling networked appliances and devices from anywhere and from an easily accessible control center. This helps to control your home – with better convenience, better control, saves money and time resulting in a smarter home.
The concept of Home Automation is nothing new. It has been around for a long time. I have used X10 products well over a decade ago. You start with compatible devices which you control with a hand-held remote control. At that time, you used RF frequencies with limited range to control your plugged in devices.
Now there is a wide range of options.
Apple’s HomeKit “is a framework for communicating with and controlling connected accessories in a user’s home.” Google’s Nest ties together devices that “work with nest” for orchestrating personalized comfort, safety and energy savings.
Home/Office automation at the current level of net connectivity implies networked devices and control units which can accept scheduling and interactivity making our lives easy and ‘predictable’.
We started with the premise that our home automation system should :
a. Be Reasonably priced
b. Use existing resources as much as possible
c. Ideally use Open Source Products/Software
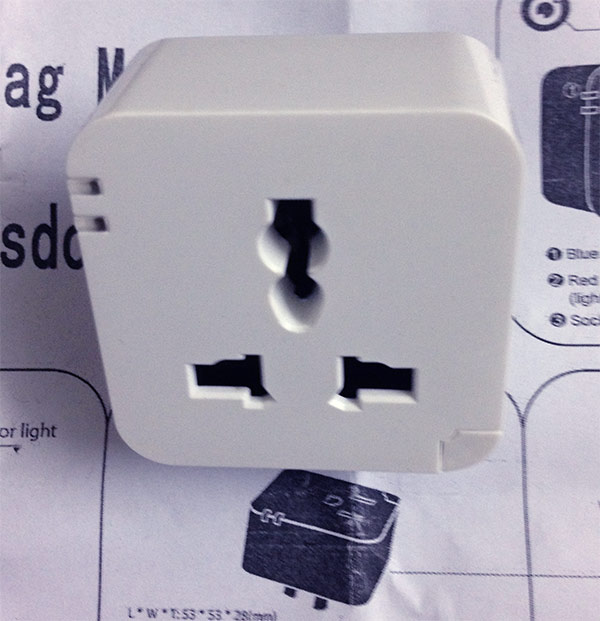
We hunted for Wifi-enabled devices which we can orchestrate with our simple home-brewed control unit. We spotted this Kankun Wifi Switch costing about US $ 18/- . For a fistful of dollars we can have 5 devices hooked to our control system and we don’t need to bring out our soldering iron at all. So here is what we did:
What you need:
1. Control Unit with Net connectivity
2. Few Wifi Switches
3. Your Mobile Phones/Desk top Browsers
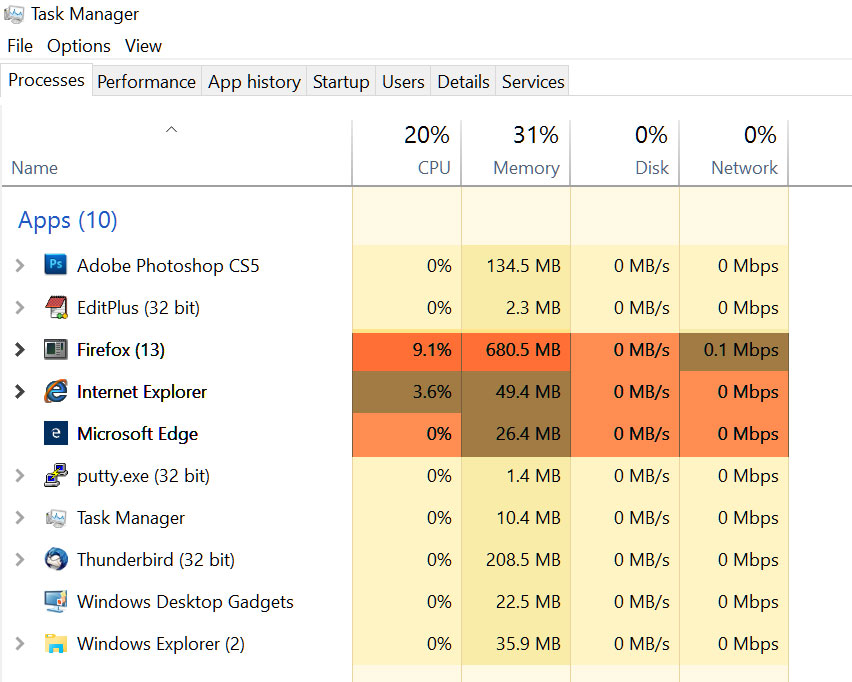
We decided to use the ubiquitous linux box which anyway worked as a NFS server, Router and Firewall – for our control unit. In case you don’t have one linux box conveniently around, you could use a Raspberry Pi. Our Linux box is running on CentOs and to tell you the truth it is getting a little longer in the tooth. It was built about 6 years ago and uses AMD Athlon 1.9 GHz Processor and 2 GB RAM mated to a 1 TB hard drive. It serves its job very well. That is just to give you an idea that your control unit need not be the latest flashy hardware for this kind of task.
We didn’t have to reinvent the wheel for the Wifi Switch. The folks at Google Group ‘Kankun wifi switch plug‘ have done the heavy lifting for us – CGI scripts, techniques to hack into the Switch and plenty of information on the device.
This Switch uses a Qualcomm Atheros AR9331 processor which is a highly integrated and cost effective 400 MHz System-on-a-Chip (SoC) mated to 32 MB RAM. It uses a relay rated at 10 A (250V) to control the plugged in appliance.
Here is what we found when we logged in:
root@koven:/etc/config# df -h
Filesystem                Size      Used Available Use% Mounted on
rootfs                    1.0M    304.0K    720.0K  30% /
/dev/root                 2.0M      2.0M         0 100% /rom
tmpfs                    14.2M     68.0K     14.1M   0% /tmp
/dev/mtdblock3            1.0M    304.0K    720.0K  30% /overlay
overlayfs:/overlay        1.0M    304.0K    720.0K  30% /
tmpfs                   512.0K         0    512.0K   0% /dev
cat /proc/cpuinfo

system type		: Atheros AR9330 rev 1
machine			: TP-LINK TL-WR703N v1
processor		: 0
cpu model		: MIPS 24Kc V7.4
BogoMIPS		: 265.42
wait instruction	: yes
microsecond timers	: yes
tlb_entries		: 16
extra interrupt vector	: yes
hardware watchpoint	: yes, count: 4, address/irw mask: [0x0000, 0x0580, 0x0610, 0x00c0]
isa			: mips1 mips2 mips32r1 mips32r2
ASEs implemented	: mips16
root@koven:/proc# cat meminfo
MemTotal:          29060 kB
MemFree:            8892 kB
Buffers:            1736 kB
Cached:             5760 kB
SwapCached:            0 kB
Active:             5232 kB
Inactive:           4288 kB
Active(anon):       2072 kB
Inactive(anon):       20 kB
Active(file):       3160 kB
Inactive(file):     4268 kB
Unevictable:           0 kB
Mlocked:               0 kB
SwapTotal:             0 kB
SwapFree:              0 kB
Dirty:                 0 kB
Writeback:             0 kB
AnonPages:          2040 kB
Mapped:             1864 kB
Shmem:                68 kB
Slab:               4732 kB
SReclaimable:        976 kB
SUnreclaim:         3756 kB
KernelStack:         320 kB
PageTables:          280 kB
NFS_Unstable:          0 kB
Bounce:                0 kB
WritebackTmp:          0 kB
CommitLimit:       14528 kB
Committed_AS:      13480 kB
VmallocTotal:    1048372 kB
VmallocUsed:        1520 kB
VmallocChunk:    1043424 kB
dmesg (Snip)
Linux version 3.10.26 (zhaoyuanbiao@ubuntu) (gcc version 4.6.4 (OpenWrt/Linaro GCC 4.6-2013.05 r39365) ) #44 Tue Jul 29 11:44:32 CST 2014
 MyLoader: sysp=00d73bc7, boardp=ed0c292e, parts=97cba183
 bootconsole [early0] enabled
 CPU revision is: 00019374 (MIPS 24Kc)
 SoC: Atheros AR9330 rev 1
 Clocks: CPU:400.000MHz, DDR:400.000MHz, AHB:200.000MHz, Ref:25.000MHz
The manufacturer has thoughtfully provided with Android/iOS app to control the unit. We found that it is better to deploy these switches directly through command line mode.
Our devices came with the following default values:
default ip: 192.168.10.253
default username/password is “root/p9z34c”
You need to set up the device after plugging it in and resetting it:
Wait for 20 seconds till the blue LED starts to blink slowly.
In case if it fails to blink – press the small thumb Switch for about 4 seconds and the switch will reset to factory default setting.
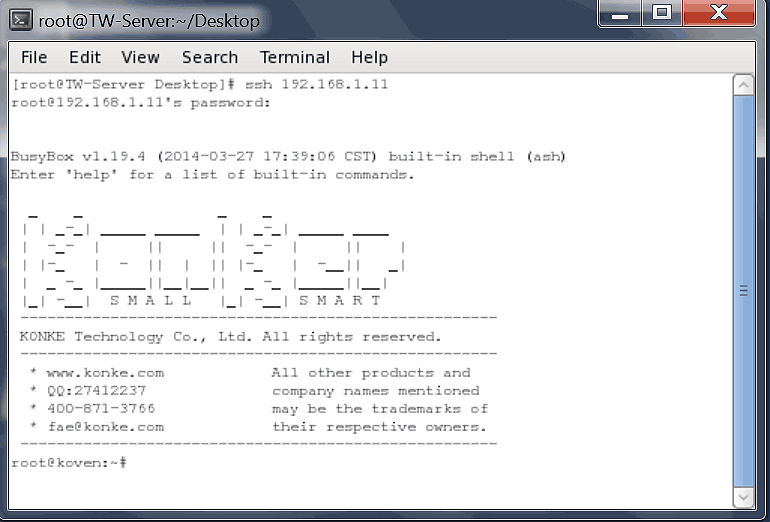
Now login to the Wifi Router using the default values given above through SSH.
You will be greeted with this:
Once you are logged in set up the wifi switch as per your Home Wifi Router:
Add to this file: /etc/config/wireless
config wifi-iface
option device radio0
option network wwan
option ssid 'YOUR SSID'
option mode sta
option encryption psk
option key 'Preshare Key'
Modify the file : /etc/config/network
config interface 'loopback'
	option ifname 'lo'
	option proto 'static'
	option ipaddr '127.0.0.1'
	option netmask '255.0.0.0'

config globals 'globals'
	option ula_prefix 'fdb4:4233:8f63::/48'

config interface 'lan'
	option ifname 'eth0'
	option type 'bridge'
	option proto 'static'
	option ipaddr '192.168.10.253'
	option netmask '255.255.255.0'
	option ip6assign '60'

config interface 'wwan'
	option proto 'dhcp'

config interface 'stabridge'
	option proto 'relay'
	option network 'lan wwan'
Now create a file relay.cgi here: /www/cgi-bin/
Add the following to the file:
#!/bin/sh
echo "Content-Type: text/plain"
echo "Cache-Control: no-cache, must-revalidate"
echo "Expires: Sat, 26 Jul 1997 05:00:00 GMT"
echo
RELAY_CTRL=/sys/class/leds/tp-link:blue:relay/brightness
case "$QUERY_STRING" in
state)
case "`cat $RELAY_CTRL`" in
0) echo "OFF";;
1) echo "ON" ;;
esac;;
on)
echo 1 > $RELAY_CTRL
echo ON;;
off)
echo 0 > $RELAY_CTRL
echo OFF;;
toggle)
case "`cat $RELAY_CTRL`" in
0) echo 1 > $RELAY_CTRL
echo "ON";;
1) echo 0 > $RELAY_CTRL
echo "OFF" ;;
esac;;
esac
After you are done set the file to execute mode : chmod 755 relay.cgi
Now you add the html file here: /www/index.html
<html>
<head>
<style>
*{ margin:0; padding:0; }
html, body{ height:100%; }
body{ font:15px/1 arial; text-align:center; background:#FFFFFF; }
body:before{ content:''; display:inline-block; height:100%; vertical-align:middle; }
.checkboxControl2{
border:2px solid #102838; border-radius:7px; display:inline-block; vertical-align:middle; font-weight:bold;
width:90px; height:100px; position:relative; margin:0 5px;
color:#12678C; box-shadow:0 0 5px rgba(255,255,255,.4);
}
.checkboxControl2 input{ position:absolute; visibility:hidden; }
.checkboxControl2 > div{
background:-webkit-linear-gradient(top, #002B44 0%, #0690AC 11%, #038EAA 14%, #A0F2FE 58%, #91DBE7 96%, #B9E8E8 100%);
background:linear-gradient(to bottom, #002B44 0%, #0690AC 11%, #038EAA 14%, #A0F2FE 58%, #91DBE7 96%, #B9E8E8 100%);
height:100%; border-radius:5px; line-height:50px; z-index:1; cursor:pointer; text-shadow:0 1px rgba(255,255,255,0.5);
}
.checkboxControl2 > div:after{
content:'ON'; display:block; height:50%; line-height:4;
transform-origin:0 0; -webkit-transform-origin:0 0;
}
.checkboxControl2 > div:before{
content:'OFF'; display:block; height:50%; line-height:2.5;
border-radius:80%/5px;
box-shadow:0 8px 12px -13px #89DFED inset, 0 -2px 2px -1px rgba(255,255,255,0.8);
transform-origin:0 100%; -webkit-transform-origin:0 100%;
transform:scaleY(0.7); -webkit-transform:scaleY(0.7);
}
.checkboxControl2 :checked ~ div{
background:-webkit-linear-gradient(bottom, #002B44 0%, #0690AC 11%, #BFD6EA 14%, #bfd6ea 58%, #BFD6EA 96%, #B9E8E8 100%);
background:linear-gradient(to top, #002B44 0%, #0690AC 11%, #038EAA 14%, #A0F2FE 58%, #91DBE7 96%, #B9E8E8 100%);
}
.checkboxControl2 :checked ~ div:before{
border-radius:0; box-shadow:none;
transform:none; -webkit-transform:none;
}
.checkboxControl2 :checked ~ div:after{
border-radius:80%/5px;
box-shadow:0 -8px 12px -5px #89DFED inset, 0 2px 2px 0 #0690AC;
transform:scaleY(0.7); -webkit-transform:scaleY(0.7);
}

.checkboxControl2 .indicator{ position:absolute; top:45px; left:32px; width:25px; height:8px; box-shadow:0 0 8px #000 inset; border:1px solid rgba(255,255,255,0.1); border-radius:15px; transition:0.2s; -webkit-transition:0.2s; }
.checkboxControl2 .indicator:before{ content:''; display:block; margin:2px auto; width:8px; height:5px; border-radius:10px; transition:0.5s; -webkit-transition:0.5s; }
.checkboxControl2 :checked ~ .indicator:before{ box-shadow:0 0 2px 0px #F95757 inset, 0 0 12px 6px #F95757; background:#FFF; transition:0.1s; -webkit-transition:0.1s; }
</style>
<script>
var timerx = setTimeout(function(){ switchx("state"); }, 9000);
function switchx( cmd )
{
if ( timerx ) clearTimeout(timerx);
var relay = new XMLHttpRequest();
relay.open('GET',"/bin/relay.cgi?"+cmd, true);
relay.send();
relay.onreadystatechange = function()
{
if( relay.readyState == 4 )
{
if ( relay.status == 200 )
{
if (relay.responseText.indexOf("ON")>=0)
{
$('cbox').checked = true;

}
else
{
$('cbox').checked = false;
}
}
}
}
timerx = setTimeout(function(){ switchx("state"); }, 9000);
}
function check(checkbox)
{
if (checkbox.checked)
{
switchx('on');
}
else
{
switchx('off');
}
}
function $(id) { return document.getElementById(id); }
</script>
</head>
<body onload="switchx('state')">
<label class='checkboxControl2'>
<input type='checkbox' id="cbox" onclick="check(this)" />
<div></div>
<span class='indicator' id="Lnav"></span>
</label>
</body>
</html>
The above CGI script and the html file were adapted from somebody’s work. I am sorry that I can’t find their names to give the credit where it is due. I apologize for any acts of omissions and commission.
With that we are done with the Wifi Switch. Your Home Wifi Router should allocate Dynamic IP address to the individual Wifi Switch. If your Wifi Router allows you to set the DHCP static IP table, then add the respective MAC address and the IP address to each Switch individually so that the same IP address is served by the DHCP server to the same Switch.
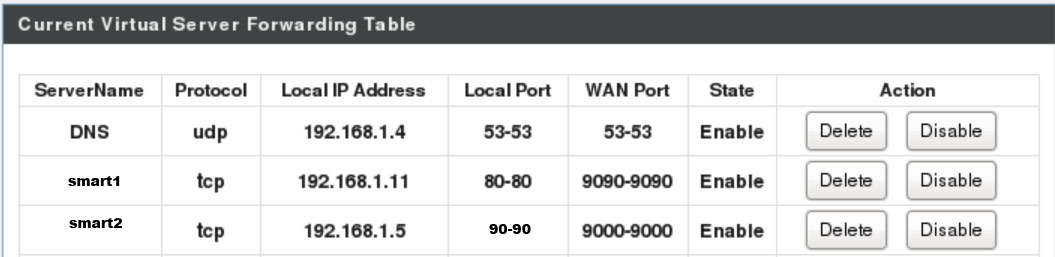
Now to control the Switches from outside, you need to forward the IP Address/Port in the Wifi Router. In our case, I have forwarded one switch like this:
Now you can control the devices plugged into these switches directly like so:
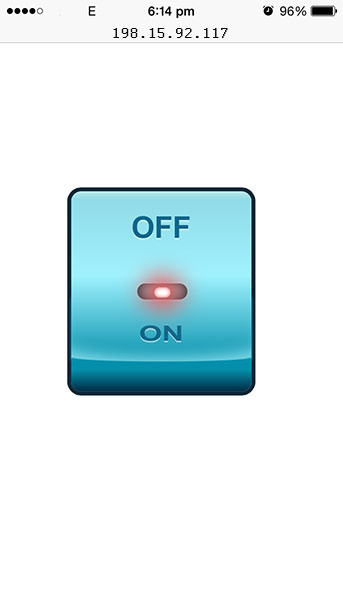
To control individual Switch : Point your Mobile browser to: your external IPaddress:forwarded-port/
Here is a screenshot of an iPhone:
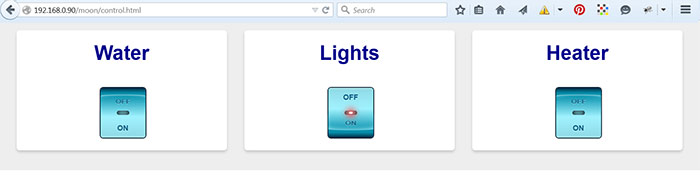
To control a group of Switches: add the following to your linux control box in the document root:
<!DOCTYPE HTML PUBLIC "-//W3C//DTD HTML 4.01 Transitional//EN" "http://www.w3.org/TR/html4/loose.dtd">
<html>
 <head>
  <title>Master Control</title>
 <style>
 body{margin : 0; height:100%;
  }

div.container{
    width:100%;
    height:100%;
    padding-bottom:40px;
    display:block;
    background-color:#eee;
    font-family:arial, Helvetica, sans-serif;
    font-size:0;
}
div.box{
    color:#000090;
    background-color:#fff;
    width:30%;
    font-size:40px;
    font-weight:bold;
    margin:20px 0 0 2.5%;
    line-height:90px;
    display:inline-block;
    border-radius:6px;
    box-shadow:0 4px 5px #ccc;
    text-align:center;
    *display:inline;
    zoom:1;
}

@media all and (max-width:950px){
    div.box{
        width:47%;
       margin:20px 0 0 2%;
    }
}


.seto{
display : block;float:left;
height : 200px;
width : 30%;
color : #000090;
font-family : arial, Helvetica, sans-serif;
font-size : 14px; text-align : center;
text-indent : 20px;
}
 </style>
 <meta name="viewport" content="width=device-width, initial-scale=1.0">
  </head>

 <body onload="start()">
 <div class="container">
 <div class="box">
 Water
 <iframe src="http://192.168.1.11/" frameBorder="0"></iframe>
 </div>

 <div class="box">
 Lights
<iframe src="http://192.168.1.12/" frameBorder="0"></iframe>
</div>

<div class="box">
 Heater
 <iframe src="http://192.168.1.14/" frameBorder="0"></iframe>
 </div>
 </div>
 </body>
</html>
To schedule a routine timer for a device: Create a cronjob like so: (this turns on the device – in this case a solonoid valve to turn on the irrigation for my plants at 10 am for 10 minutes)
0 10 * * * /usr/bin/wget -O – -q http://192.168.1.11/cgi-bin/relay.cgi?on > /dev/null
10 10 * * * /usr/bin/wget -O – -q http://192.168.1.11/cgi-bin/relay.cgi?off > /dev/null
This is a long blog on Home Automation with many steps to set up/configure and establish some control over the networked devices.
We have set up a cooling fan to reduce the working temperature of sensitive equipment in our lab when the Air-conditioning is not turned on holidays. But then it is for another day and another blog.