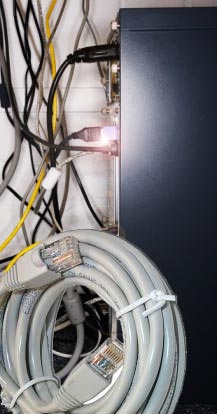
My partner has long been complaining about the bird’s nest of networking cables behind her main computer. She has a simple enough set up – 3 desktops and a couple of Laptops equipped with Wifi. But the growth of networking cable and the constant changing of settings in her main computer was getting on our nerves.
So it was finally decided that I ought to sort out this problem with minimal interruption. A quick look at the available options was bewildering. What she needed was a sure-fire quick solution, which required easy setting up, and the route has to be the least complicated.
To cut a long story short, I decided on a Wireless router with a few LAN Ports thrown in. It needs to have a basic firewall as well. This is not a tall order and there are hundreds of products available. A call to the local store revealed that they have many brands to choose and I selected DLINK DI 524 router for this task. The selection process was not based on any obscure logic. It was a matter of availability and ease of use.
The existing set up used an Ethernet Switch and all computers shared the internet access through the main computer’s ICS ( Internet Connection Sharing). Windows 2000 and Windows XP allow you to share your internet connection with other networked computers. Windows XP also ships with built-in firewall. I had installed an additional Network Card to handle the external cable modem and the first NIC (Network Interface card) was configured as the gateway for the rest of the computers.
So I unpacked the DI 524 from its box and connected the mains supply. Nothing much happened, of course, save for the front green LEDs lighting up. All 3 computers were connected to the Ports. DI 524 comes with a 4-port Ethernet switch and a DHCP server. As we have manually setup the individual IP addresses for all the computers and there are not too many computers around, the use of DHCP was not enabled.
DI 524 is ideally suited for a small home office (SOHO) networking needs. It has the usual hardware Webserver to administer the router. It is based on 802.11g which operates on 2.4 GHz frequency. Not much of a choice when you go by the standard 802.11b/g as they use this frequency, which is also used by some cordless phones and microwave ovens. This would become an issue with women and laptops in the wrong place – kitchens. Fortunately as it turned out, my partner’s microwave or the Wireless router or the partner never complained about each other – at least to me.
With its stub 4 inch antenna, the unit provided excellent connectivity up to the lawn – about 100 feet away.
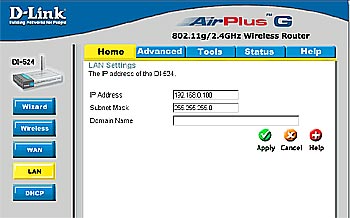
When connected to the webserver through a browser – http://192.168.0.1/ you get a nice crisp screen of menu. There is a wizard to help you along the way, which I didn’t use as I wanted to set up everything manually. I like the hard way in everything I do.
You can do it in any order. But I went straight to the LAN.
Click on LAN and set up the IP address of the router. I set up the IP address to 192.168.0.100 as already the main computer has its internal IP set to 192.168.0.1
Use the default subnet mask at 255.255.255.0 and click on apply. This router is like Windows – it loves to reboot after every move.
Now point your browser to http://192.168.0.100/- and continue.
Click on WAN and set up the cable modem details as you would normally in the main computer. It pays to note down the exact IP address, subnet mask, ISP gateway IP address and the DNS IP addresses. Now click on apply and it will whir for a couple of seconds and say rebooted.
It is not over yet. You still need to set up the firewall before anyone can see anyone inside or outside. You can build complicated firewall rules later when you need them. I added one bit of line – called as action – normal – and allowed LAN complete access to WAN. Not a bright idea when you set up a firewall. You simply bypass the firewall with this rule. But then we just want to rig the unit up as quickly as possible. We will write elaborate firewall rules as we cross this stage.
Voila. We are done and we can see that all machines can access the Net without any machine using ICS.
Now time to set up the Wireless section. Here is a snippet from the device’s help file:
Network ID(SSID) :Network ID is used for identifying the WLAN. Client stations can roam freely over this product and other Access Points that have the same Network ID.
(The factory setting is default)
Channel :The radio channel number. The permissible channels depend on the Regulatory Domain.
(The factory setting is channel 6)
Security :This device supports four different types of security for wireless network.
Wire Equivalence Protection (WEP) :This is a security feature to secure wireless data transmission. Enable WEP encryption to protect your data while it is transferred from one station to another. Select from 64, or 128-bit WEP encryption. 64-bit WEP requires 10 hexadecimal digits, 128-bit WEP requires 26 hexadecimal digits. Hexadecimal digits consist of numbers (0-9) and alphabet characters(a-f).
802.1X (Authenticate with Radius Server) :If the users want to use this security-type.At least,a radius for authentication or WEP for data Encryption. Enter the IP address of Radius server.Then select the encryption bit (64 or 128) and RADIUS Shared Key.
WPA-PSK :Another encryption options for WPA-PSK, TKIP (Temporal Key Integrity Protocol). enter a password in the WPA-PSK field between 8 and 63 characters long for ASCII. 64 characters(0~9,a~f) for HEX.
WPA (Authenticate with Radius Server) :The users have to get a access form RADIUS server by performing user authentication. Enter the IP address of Radius server and RADIUS Shared Key.
WPA2-PSK(AES) :Accept WPA2 clients only and Pre-share key (encryption key) must be entered manually. You can input either 32 ASCII characters or 64 Hexadecimal digits asPre-share key.
WPA2(AES) :Accept WPA2 clients only and work simultaneously with RADIUS Server. The encryption key is got from RADIUS Server dynamically.
WPA-PSK / WPA2-PSK :Accept WPA1 or WPA2 clients to connect simultaneously and Pre-share key (encryption key) must be entered manually. You can input either 32 ASCII characters or 64 Hexadecimal digits as Pre-share key.
To keep things simple, I opted for WEP (Wired Equivalent Privacy) with 128 bit WEP key by using a string of 26 Hexadecimal (Hex) characters and the Laptops can access the network with similar combination of WEP key. I have followed the dictum – KISS – Keep it simple Stupid. You can always add complexity later as you go along. But this is a hands-on on a painless way to set up a Wireless Router.
For a device barely costing about $30, it provides all the basic functionality.
Time to brew a strong coffee from the microwave ….