Reduce Page Load Time

Search Engine Giant Google has recently indicated that it may consider the speed of your website as one of the ranking factors in future. As a Webmaster, you know this all along – a faster loading page added to the positive feel. Ironically most designers create elaborate visually appealing eye candies to enhance the user appeal without realizing that the extra loading time actually detracts from the positive note.

This blog will take a look at the techniques and best practices recommended by Google through its Page Speed http://code.google.com/speed/ and Yahoo’s Best Practices for Speeding Up Your Website – http://developer.yahoo.com/performance/rules.html

If you check out these recommendations, you will realize that some of the best practices are primarily intended for the corporate websites. As usual we try to distill the collective wisdom into a condensed format useful for the average Joe Webmaster. The tips you will find here could be used to speed up the access time of your pages without having to break your bank or the need to hire a Rocket Scientist to re code.

The summary of optimizing your pages and reducing the page load time:

1. Reduce file size:

1a. Start with your images: Optimize your images:

Do you know that our TargetWoman – which is primarily a content rich site still accounts for just a little over 54 % of its bandwidth consumption to image traffic ?

Simple approach – the larger your file is – whether it is a flash file or an eye candy high resolution image or a HTML/CSS/Javascript file, the longer it takes for the visitor’s browser to access. If it is an image, ask your designer to selectively manipulate or compress the image. A carefully optimized image can often bring down the file size to half its former size.

For static content optimize browser/proxy caching by setting longer expiration time. If you are in an Apache server the following snippet of code in your .htaccess can help caching your image files:


< FilesMatch "\.(jpg|jpeg|png|gif|swf)$" >
Header set Cache-Control "max-age=2592000, public"
< /FilesMatch >

The max-age figure allows caching upto 30 days. If you check your server’s header information, it will return the following (example):


HTTP/1.1 200 OK
Date: Mon, 30 Nov 2009 11:17:00 GMT
Server: Apache/2.2.14 (Unix)
Last-Modified: Wed, 25 Nov 2009 12:44:26 GMT
ETag: "1a5a0f1-67ec-479316b377e80"
Accept-Ranges: bytes
Content-Length: 26604
Cache-Control: max-age=2592000, public
Connection: close
Content-Type: image/jpeg

Declare your image’s width and height value in HTML to help the browser to render the image faster.

1b: Optimizing Code:

When it comes to CSS optimization, avoid CSS expressions and combine many files into one. Remove redundant directives and minify the file. Same way combine several Javascripts into one external file and minify it. Make references to CSS and Javascript in the header of the HTML file. If you use Google Page Speed, you can use closure compiler which can minify Javascript – available from here.
On the other you can use YUI compressor from here to minify too.

Another feature of Google Page Speed is its ability to compress images (if you reference to a page with images) and save them to a configurable directory locally. You might find this a time saver. This alone is a reason to download the Page Speed for your Firefox browser. Head to this link for using Page Speed .

You would need Firebug Addon to your Firefox browser before you can use Page Speed.

If your ASCII content (Javascript and HTML) runs to more than a few tens of kbytes, you should consider Gzipping these components. Saves on bandwidth costs as well as on loading time.

2. Server Side Tweaks to reduce the page load time:

Reduce HTTP requests by combining several components into one. We had mentioned in the previous paragraph how you should combine many Javascript files into one. We also offered a tip to use a longer expiry time for cacheable images in Apache servers.

Avoid redirections as they add to the repeat traffic between the server and a browser.

Weed out 404 errors from your pages. If you use a clever 404 error trapping script to deliver an intuitive alternative to the visitor like this site, it is all the more reason to be wary of 404 errors. A careless reference to a non-existent image can fire up the engine which services the error trapping call whilst the browser waits for the continuation of other components.
Reduce Page Load time

Reduce DNS lookups – every time a browser encounters a new domain name, it can take up to 20-120 milliseconds to look up the IP address. This latency can be minimized if you use the IP address directly. Split components across domains to enhance parallel download.

Cookies: Serve static contents from a cookie less domain. Domains which serve cookies take up additional back and forth traffic which is not required for serving static contents. Whilst at this, reduce the size of the cookie set by your server.

Use consistency in referencing resources: It is quite a mouthful to just say it. You can save quite a bit of time by adopting consistency in your references. For example, you have a Carousal which needs a longish Javascript, you must make references to it like so: www.domain.com/carousal.js for all pages residing anywhere in your domain or subdomains. Absolute URLs to a consistent reference point shaves off time perceptibly.

Upgrading WordPress

Many security vulnerabilities have been found in older software and WordPress is no exception. Some malicious elements have found a way to alter parts of the header or footer files in many unsuspecting WordPress installations. So it would be very prudent to keep up with the release of recent patched software.

If you follow the guidelines as detailed here, it will be relatively painless. I will also go over a few ways how you can secure better your WordPress installations. Remember that you have to be lucky all the time whereas for the malicious hacker – he has to be lucky just once.

Recipe for Upgrading WordPress

Items Required & Method

1. Grab the latest version of WordPress from here: http://wordpress.org/download/

At this time it is available in two formats – gunzipped version for the Unix/Linux boxes and zipped version. You can grab any version which will suit you. Extract to a local directory and keep aside.

2. Backup your present Installation. If you have access to the control panel of your server, take a mysql backup of all the data from your WP.

Copy all the files from the root, wp-admin, wp-content and wp-includes into another directory, or better still copy to your local machine. In case something goes wrong, you need to have a fall back plan.

Open wp-config.php and save the // ** MySQL settings ** // information somewhere close. You will need to hang on to this file if you want to have a trouble free upgrading experience.

3. Place an index.html with a message – “The Blog is undergoing some changes” and some polite message to the effect that the service will be unavailable for some time. You should take only a few minutes for the complete upgrading process. But still it is nice to put up a temporary index.html

At the time of upgrading your server will likely throw up some error message which is best avoided.

4. Now it is time for the Rock and Roll ! Now go ahead and delete the following 2 directories ONLY:

Wp-admin

Wp-includes

Some FTP clients will protest if you are trying to delete the directory with files inside. Use your control panel’s file manager for this task.

Upload your extracted wp-admin and wp-includes to the production server.

Now copy all the files over the old files. If you use any of the themes from the themes directory, leave them for now.

You will find the following files under the themes directory:

  1. comments.php
  2. comments-popup.php
  3. sidebar.php
  4. header.php
  5. footer.php
  6. functions.php
  7. index.php
  8. style.css
  9. rtl.css
  10. screenshot.png

Edit them – adding whatever changes you have incorporated into these files. Then transfer these files over.

5. The final step: Launch your browser and point to your blog/wp-admin/ and you will be greeted with a login screen. Login and you will be taken to the upgrade part where it will ask your approval to fill in the data. The upgraded version will look for the config file from the root where it stores the database connection details. So if you have done the steps as detailed here, you will have completed the upgrading process with out any fuss.

WordPress Security Details

Matt Cutts has this to say about securing the WordPress installation – http://www.mattcutts.com/blog/three-tips-to-protect-your-wordpress-installation/

The recent version ( at the time of writing this blog – it is 2.5.1) doesn’t have the earlier vulnerabilities regarding the plugins where anyone can see what plugins you have installed by just looking at the directory index. The newer version will show the “Sorry, no posts matched your criteria.”

It would be a good idea to lock down the wp-admin directory by any of the following means:

  1. Place Password protection to this directory. Use Apache server’s password protected directory mode. You will see this error message – “Sorry, no posts matched your criteria.” Instead of a 403 Status code.
  2. Use .htaccess to block unauthorized access. A sample is shown as below:

Order Deny,Allow

Deny from all

allow from 67.23.67.255

The above directives will block the world from accessing this directory, but allows access only to the IP 67.23.67.255 ( not a real IP )assuming that is your IP.

OCR with Webcam

OCR with Ubiquitous Webcam

Optical Character Recognition (OCR) technology has matured to include digital image processing and with the kind of processing power available in the average Personal computer, it should come as no surprise that in these days the accuracy of the OCR exceeds 99 %.


Typically most software commercial or free would require that you use a TWAIN compliant scanner to capture the image you want to use for converting to editable text. For best results this might be the only way as you need to present the best possible image for the OCR software to work upon. You will need to acquire black and white or grayscale image as color information would confound the OCR process.


In case your software has any issues working with your scanner, you can still save the scanned image in a TIFF (Tagged Image File Format) format and invoke the OCR software with this TIFF file. Most image editing tools will have no problem converting the images to this TIFF format.


When you are in the office, it would not be an issue to use the services of a desktop scanner to convert the magazine page or newspaper page to electronic format. Many a time you would see when you are traveling – a magazine article or a newspaper page which would be ideal to illustrate your stand. Only thing that would stop you is the lack of accessibility to a desktop scanner. You don’t have to wring your hand in despair anymore.

Your Laptop may already be equipped to take care of not only the means of capturing the newspaper/magazine page, but also the requisite software to convert the acquired image to editable text format. I wanted to do a bit of test in this line and this is what I found out.


I have a Laptop with barebones software installed and not too many techno wiz attachments. The notebook is equipped with a 1.3 mega pixel (extrapolated resolution) Web camera and MS Office installed amongst other things. A typical scenario.


I used the webcam to “capture” this image displayed here from an old magazine. You can see from the faded sepia toned color that the magazine must have been sitting at the shelf for ages. Again the choice of this torn page was deliberate to demonstrate that if we can get any decent result from such a faded magazine page, you should get far better results with a better recent subject.

OCR with Webcam

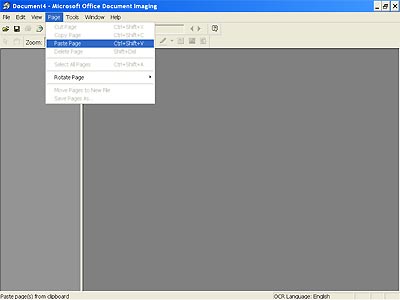
Now you need an OCR software to complete the conversion process. You need to look no further than the standard MS office software suite for this.

Click on All Programs – > Microsoft Office – > Microsoft Office Tools – > Microsoft Document Imaging

You will have a “free” OCR software here and it will take the above image acquired from the Webcam. Just click on Page from the top menu and select the and you will get the following page:

OCR software

Click on Tools – > Recognize Text using OCR and it will have converted the image into editable text ready to be ported to MS Word. Click again on Tools – > Send Text to Word and your MS Word will fire up with the converted text.

This is what mine did at the end of the exercise:

A T one tirn, p!opIe
did&t daw to svar
t3eMhe’r—go1d’ look. But
rw dlnw gold teamed
with
pLItinuTn or white
ldz so in, and Ioks so
good, u
wonder why it
took u so long. At InterCold. there i a .triking rngi. of unfussy, elcg.mt jcseItery rings. earrin. chair . and pvidant in theit very f fordable Career Carals range. embellished with diamond and pearls. Prices begin at R 3.)OO. And for tho thinking of tying the knot, it you haven’t chcn our wedding nng yet, take a peek at the ‘Rings for E1rnitv’ range. You’ll go mad trying to make up your mind…

Not too good – You would say. But you had supplied a color image in the first place. With a bit of image manipulation and a grayscale image the eventual outcome is almost 85 % accurate. Not bad for a basic web cam based OCR.

Our Parent site TargetWoman - the leading women portal presents painstakingly researched extensive information in the form of thousands of condensed pages. It offers the widest and the most detailed information on subjects women care.