We have covered UV spectrum and sources of UV light in our earlier blog. We will cover the basic techniques of UV Photography using the ubiquitous digital cameras in this blog. For our “experiments” we have used a not so expensive Olympus SP 510 UZ digital camera which has a 7 mega pixel resolution and a 10 X optical Zoom.
There are 2 ways you can capture images under UV illumination – one to exclude all available light using a UV pass filter like a Wratten 18A or use a darkened room and light up the subject using UV light alone. We will use the latter method as it is the easiest way to gain some valuable experience with minimum outlay in terms of equipment.
You will need a robust tripod, a UV fluorescent light (in our case we used the 6 inch F6T5/BLB tube) and your trusty digital camera. The BLB tube indicates that it has a Black Light Blue which produces output in the UV-A spectrum.

UV Photography:
Select your subject and position that in a room with all blinds drawn. Light up the subject with a similar 6 inch fluorescent tube. Ideally both the normal light and the UV light should be placed in the same position facing the subject. Set up the camera on a tripod and switch off all the lights except the normal small tube light. Switch into manual mode in the digital camera. This allows you to set the long exposure required to capture the subject lit only by the UV light. The metering system in your camera would have been optimized for visible light spectrum.
Focus the camera and set the exposure for the visible light. Observe the first photograph here which shows a flower urn with artificial flowers. We used f /5 aperture at 1 second shutter speed settings for this shot. These figures are approximate and you may need to experiment depending upon your camera equipment and lighting factors.
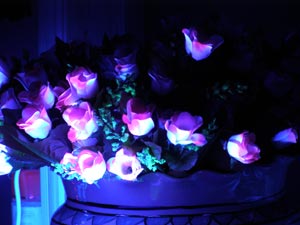
Now turn off the normal light and switch on the UV fluorescent tube. Change the shutter speed to at least one second if your subject is not the fluorescing kind. Your subject and its susceptibility to fluoresce determines the eventual exposure settings. You may have to bracket the shots for optimum results. We used the same aperture with 3 seconds shutter speed for this UV photo.
Notice the UV lit flower urn and the color fringing effect possibly owing to the long exposure time and chromatic aberration due to the achromatic lenses used in our camera.
You can use a smaller aperture to reduce this chromatic aberration which occurs due to the slight change in focus for different light spectrum. You will have to increase the lighting for non fluorescing objects for best results.
For subjects which fluoresce under UV lighting, you will have to place the lighting in a such a way as to avoid reflections back to the camera lens which will affect the eventual image.
Observe the glowing plastic in our previous blog. It is an overexposed shot. If you leave on the automatic mode, your camera’s metering system will always over expose the shots when the subject is lit only by a UV light source.
Noting Down Information:
In the days of film cameras one would have to write down the settings in a notebook for future reference. With digital cameras, this is no longer necessary as you can refer to the Exif (Exchangeable image file format) of the picture directly.
In Windows XP and later, right click on the image file and select Properties from the Popup menu and then click on Summary – > Advanced and you can see the photograph information.
In Unix/Linux environment, if you use KDE, then the same drill of right clicking and Properties and then “Meta info” will extract all the Exif information.
This way you can improve your technique of the right exposure for the right subject.